part number R24.0451.00
Printed in Taiwan
Before you begin
Consider your connection type
How will you use your USR5430? If you want to game online through the Internet so you can play
anyone around the world, you’ll want to set up your USR5430 in Client Mode. You can also use the
USR5430 in Client Mode as an Ethernet bridge to connect any Ethernet device such as a computer,
network printer, or digital video recorder (DVR) to a wireless network. If you want to play your friend
in the same house or building and you each have a gaming console of the same brand (Xbox-to-
Xbox, Playstation-to-Playstation, or other gaming consoles), you will need to set up your USR5430 in
Ad Hoc Mode. Select one of the following and follow the installation steps accordingly.
•
Client ModeClient Mode
Client ModeClient Mode
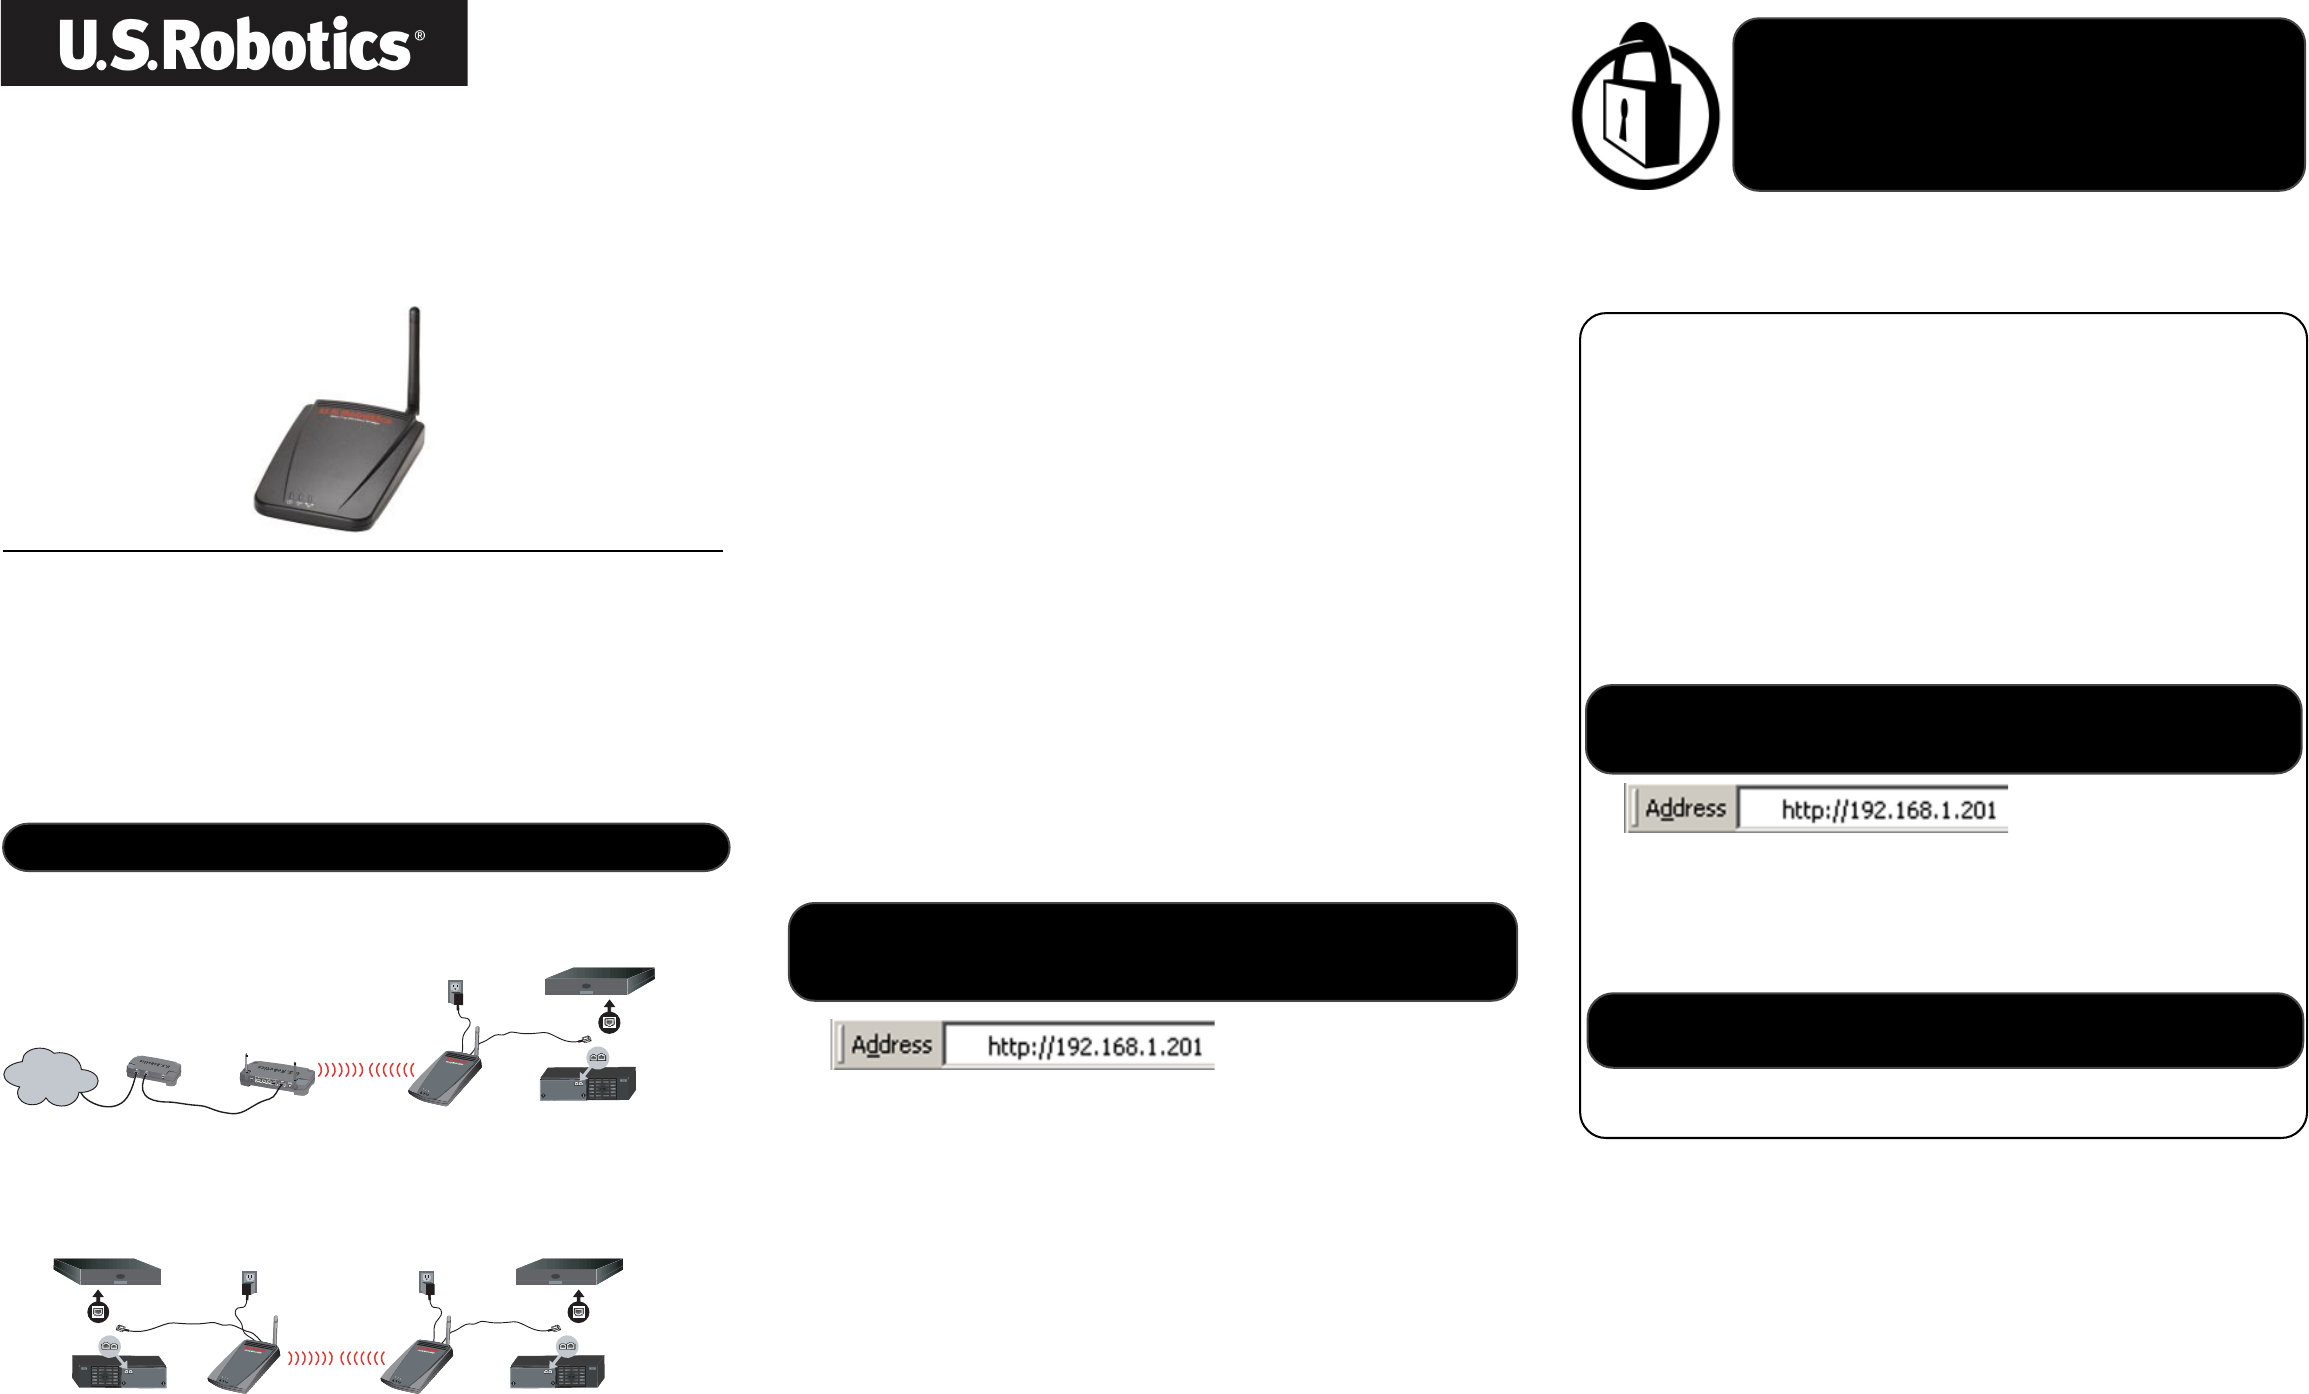
Client Mode
(most commonly used when connecting your gaming console to the Internet, as
demonstrated below; proceed to Client Mode installation):
802.11g Wireless Gaming Adapter
and Ethernet Bridge
Quick Installation Guide
The following instructions will walk you through the installation of the U.S. Robotics 5430
Wireless Gaming Adapter and Ethernet Bridge quickly and easily.
Model USR5430
•
Ad Hoc ModeAd Hoc Mode
Ad Hoc ModeAd Hoc Mode
Ad Hoc Mode (sometimes referred to as head-to-head or peer-to-peer, as demonstrated
below; proceed to Ad Hoc Mode installation):
Gaming console
USR5430
Gaming console
DVR, computer, or other Ethernet-ready device
USR5430
DVR, computer, or other Ethernet-ready device
Client Mode installation
For online gaming using the Internet or communicating with other
Ethernet-ready devices
• If you do not have security enabled on your wireless network, proceed to
Client ModeClient Mode
Client ModeClient Mode
Client Mode
installation without security enabledinstallation without security enabled
installation without security enabledinstallation without security enabled
installation without security enabled.
• If you have security enabled on your wireless network, proceed to
Client Mode installationClient Mode installation
Client Mode installationClient Mode installation
Client Mode installation
with security enabledwith security enabled
with security enabledwith security enabled
with security enabled (use
Client Mode installation with security enabledClient Mode installation with security enabled
Client Mode installation with security enabledClient Mode installation with security enabled
Client Mode installation with security enabled if your wireless
router or access point is not broadcasting your SSID or if you have WEP enabled).
• If you are not sure whether you have security enabled on your wireless network, refer to your
router and/or access point documentation before selecting one of the two options below.
Client Mode installation without security enabled
• Attach the antenna to the back of the USR5430.
• Plug the AC power adapter into the 12VDC jack on the back of the USR5430.
• Connect one end of the included Ethernet cable to the port on the back of the USR5430.
Connect the other end to the Ethernet port on your gaming console or Ethernet-ready device.
• You’re almost there. Now you need to configure your gaming console or Ethernet-ready
device. For configuration details, refer to the documentation for either your gaming console or
Ethernet-ready device.
Congratulations! Your USR5430 will automatically associate to your wireless router or access
point. You are now ready to begin gaming online through the Internet, surf the Web, or use your
Ethernet-ready device.
Client Mode installation with security enabled
• Attach the antenna to the back of the USR5430.
• Plug the AC power adapter into the 12VDC jack on the back of the USR5430.
•
Insert a pin or paperclip to press the reset button momentarily (less than 2 seconds). TheInsert a pin or paperclip to press the reset button momentarily (less than 2 seconds). The
Insert a pin or paperclip to press the reset button momentarily (less than 2 seconds). TheInsert a pin or paperclip to press the reset button momentarily (less than 2 seconds). The
Insert a pin or paperclip to press the reset button momentarily (less than 2 seconds). The
reset button is located on the back of the USR5430.reset button is located on the back of the USR5430.
reset button is located on the back of the USR5430.reset button is located on the back of the USR5430.
reset button is located on the back of the USR5430.
•
Connect one end of the included Ethernet cable to the port on the back of the USR5430.Connect one end of the included Ethernet cable to the port on the back of the USR5430.
Connect one end of the included Ethernet cable to the port on the back of the USR5430.Connect one end of the included Ethernet cable to the port on the back of the USR5430.
Connect one end of the included Ethernet cable to the port on the back of the USR5430.
Connect the other end into an Ethernet port on your computer.Connect the other end into an Ethernet port on your computer.
Connect the other end into an Ethernet port on your computer.Connect the other end into an Ethernet port on your computer.
Connect the other end into an Ethernet port on your computer.
• Open an Internet browser and enter
http://192.168.1.201http://192.168.1.201
http://192.168.1.201http://192.168.1.201
http://192.168.1.201
Note:Note:
Note:Note:
Note: If you are not able to establish a connection to the default IP address above, you may need to
release and renew your IP address. Refer to the Ping Procedure in the Troubleshooting
section of the printed User Guide for specific instructions. Alternatively, you may restart
your computer.
• Enter your username and password. The default username is
adminadmin
adminadmin
admin. The default password is
adminadmin
adminadmin
admin. Press
EnterEnter
EnterEnter
Enter on your keyboard.
• The Web User Interface will appear. Select
Client ModeClient Mode
Client ModeClient Mode
Client Mode or
Ad Hoc Mode Ad Hoc Mode
Ad Hoc Mode Ad Hoc Mode
Ad Hoc Mode and click
NextNext
NextNext
Next. Type
your wireless network SSID in the SSID field, select the corresponding Data Encryption,
Authentication, and Network Key, if applicable. Click
SaveSave
SaveSave
Save. A “Your 5430 is configured”
message will appear. Click
ContinueContinue
ContinueContinue
Continue.
•
Once you have configured your USR5430, remove the Ethernet cable from your computerOnce you have configured your USR5430, remove the Ethernet cable from your computer
Once you have configured your USR5430, remove the Ethernet cable from your computerOnce you have configured your USR5430, remove the Ethernet cable from your computer
Once you have configured your USR5430, remove the Ethernet cable from your computer
and connect to the Ethernet port on your gaming console or your Ethernet-ready device.and connect to the Ethernet port on your gaming console or your Ethernet-ready device.
and connect to the Ethernet port on your gaming console or your Ethernet-ready device.and connect to the Ethernet port on your gaming console or your Ethernet-ready device.
and connect to the Ethernet port on your gaming console or your Ethernet-ready device.
• You’re almost there. Now you need to configure your gaming console or Ethernet-ready
device. For configuration details, refer to the documentation for either your gaming console or
Ethernet-ready device.
Congratulations! Your USR5430 will automatically associate to your wireless router or access
point. You are now ready to begin gaming online through the Internet, surf the Web, or use your
Ethernet-ready device.
Gaming console
DVR, printer, computer, or other Ethernet-ready device
USR5430
Wireless Router
or Access Point
ADSL or cable modem
Internet
Ad Hoc Mode installation
For gaming console-to-gaming console play
•
Attach the antenna to the back of the USR5430.
•
Plug the AC power adapter into the 12VDC jack on the back of the USR5430.
•
Insert a pin or paperclip to press the reset button momentarily (less than 2 seconds).Insert a pin or paperclip to press the reset button momentarily (less than 2 seconds).
Insert a pin or paperclip to press the reset button momentarily (less than 2 seconds).Insert a pin or paperclip to press the reset button momentarily (less than 2 seconds).
Insert a pin or paperclip to press the reset button momentarily (less than 2 seconds).
The reset button is located on the back of the USR5430.The reset button is located on the back of the USR5430.
The reset button is located on the back of the USR5430.The reset button is located on the back of the USR5430.
The reset button is located on the back of the USR5430.
•
Connect one end of the included Ethernet cable to the port on the back of the USR5430.Connect one end of the included Ethernet cable to the port on the back of the USR5430.
Connect one end of the included Ethernet cable to the port on the back of the USR5430.Connect one end of the included Ethernet cable to the port on the back of the USR5430.
Connect one end of the included Ethernet cable to the port on the back of the USR5430.
Connect the other end to an Ethernet port on your computer.Connect the other end to an Ethernet port on your computer.
Connect the other end to an Ethernet port on your computer.Connect the other end to an Ethernet port on your computer.
Connect the other end to an Ethernet port on your computer.
•
Open an Internet browser and enter
http://192.168.1.201http://192.168.1.201
http://192.168.1.201http://192.168.1.201
http://192.168.1.201
•
Enter your username and password. The default username is
adminadmin
adminadmin
admin. The default password
is
adminadmin
adminadmin
admin. Press
EnterEnter
EnterEnter
Enter on your keyboard.
•
The Web User Interface will appear. Follow the on-screen instructions for your specific
configuration mode to configure your USR5430.
•
Once you have configured your USR5430, remove the Ethernet cable from your computerOnce you have configured your USR5430, remove the Ethernet cable from your computer
Once you have configured your USR5430, remove the Ethernet cable from your computerOnce you have configured your USR5430, remove the Ethernet cable from your computer
Once you have configured your USR5430, remove the Ethernet cable from your computer
and connect to the Ethernet port on your gaming console or your Ethernet-ready device.and connect to the Ethernet port on your gaming console or your Ethernet-ready device.
and connect to the Ethernet port on your gaming console or your Ethernet-ready device.and connect to the Ethernet port on your gaming console or your Ethernet-ready device.
and connect to the Ethernet port on your gaming console or your Ethernet-ready device.
Congratulations! If both gaming adapters are configured, you are now ready to begin gaming.
Note:Note:
Note:Note:
Note: You may need to have an online gaming kit for your gaming console. Be sure to
check your gaming console documentation for the necessary hardware and network set up.
Note:Note:
Note:Note:
Note: If you are not able to establish a connection to the default IP address above, you may
need to release and renew your IP address. Refer to the Ping Procedure in the
Troubleshooting section of the printed User Guide for specific instructions. Alterna-
tively, you may restart your computer.
Note:Note:
Note:Note:
Note: It may be necessary to set up a static IP address for each of your gaming console’s. Be
sure to check your gaming console documentation for specific static IP address
information.
Note:Note:
Note:Note:
Note: U.S. Robotics recommends the use of security to prevent
unauthorized access to your Internet connection. For additional
information regarding security features or for Troubleshooting and
support assistance, refer to the printed User Guide or visit our Web site
at www.usr.com/support
 Manymanuals.com
 Manymanuals.de
 Manymanuals.fr
 Manymanuals.it
 Manymanuals.pl
 Manymanuals.cz
 Manymanuals.es
 Manymanuals-pt.com
Comments to this Manuals